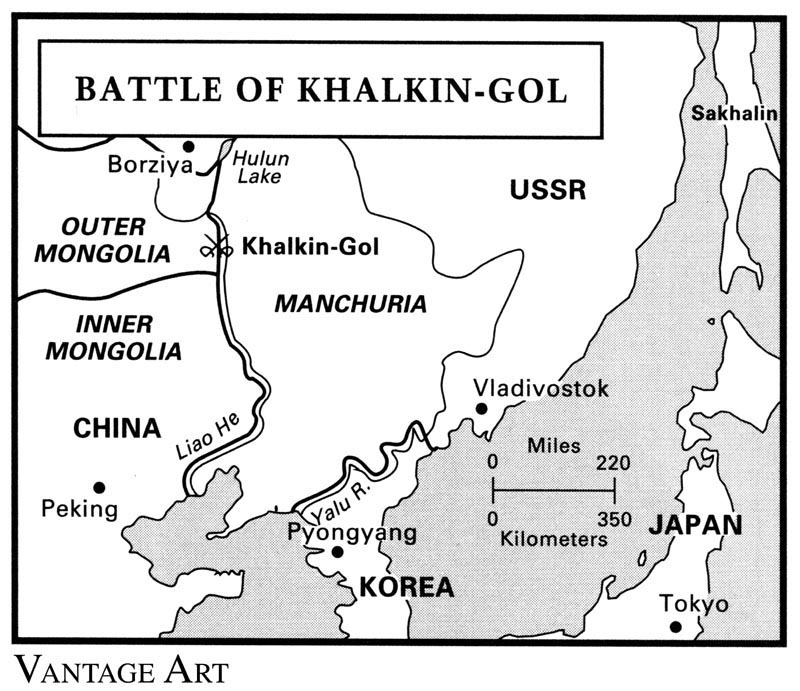
Saturday, November 26, 2016

Light Sensha Platoon!

The Light Sensha platoon consists on five Type 95 Ha-Go Light Tanks. The Type 95 was the main Japanese light tank throughout the war, fighting from early battles in China and Manchuria to late battles in the Pacific war. Detailed info on how to assembly and paint the Type 95 tanks can be found in older posts.

Three Type 95 Ha-Go on the Manchurian fields.

Saturday, November 19, 2016

Type 95 Ha-Go light tank: painting!

In this post I will explain step by step how I painted the Type 95 Ha-Go Japanese light tanks that form the Light Sensha Platoon. They were my first tanks ever painted but the result was quite a success for me. The exact colors can be found here. I freely followed the painting guide found in Rising Sun but with my available colors. First step is to prime the tanks with the Black spray primer.

Tank primed in black.

Thursday, November 17, 2016

The Mukden Incident

The Russo-Japanese War (1904-1905) ended with the Treaty of Portsmouth, which gave Japan control of the Kwantung Leased Territory and the South Manchuria Railway and forced the evacuation of Russian forces from Manchuria. The Kwantung Army was then created to protect the leased territory. In 1910, Korea was annexed into the Japanese Empire. 

Map of the invasion of Manchuria, 1931 (Pinterest).

Saturday, November 12, 2016

Puppet state of Manchukuo

The state of Manchukuo was established after the proclamation of independence of Manchuria from China on 18 February 1932, following the Japanese invasion of Manchuria. Said invasion was triggered by the Mukden Incident: Kwantung Army officers, without the approval of the Japanese government, plotted the detonation of a small bomb close to a Japanese owned railway line near Mukden. Chinese activists were blamed to have caused the explosion and in response the Kwantung Army invaded the Chinese Manchuria provinces.

Map of the invasion of Manchuria, 1931 (Pinterest).

Thursday, November 3, 2016

Type 95 Ha-Go light tank: assembly!

The Light Sensha Platoon box contains five Type 95 Ha-Go light tanks. Each tank is made of the following parts: hull and turret in plastic and the two tracks, two machine guns, the main gun and the turret hatch in metal.

Type 95 tank parts.

Sunday, October 30, 2016

Consequences of the Nomonhan Incident

Hideki Tōjō, Japanese Prime Minister (1941-44)
and Minister of War (1940-44) (wikipedia).
The Nomonhan Incident ended on the 15th September 1939 as a result of a humiliating Japanese defeat against the Soviets. This loss raised a discussion in the core of the Japanese leading officers, about if they should keep pursuing their north expansion plans (Hokuhin-ron) or switch their focus to the south (Nanshin-ron) instead. 

The end of the Nomonhan incident coincided in time with the German invasion of Poland, which was followed by the German invasion of France a year later. During this time, the Nanshin-ron was the leading policy in Japan, still fighting China in the Second Sino-Japanese War. The lack of progress in China led to the Japanese invasion of the whole French Indochina in July 1941. This invasion, due to the weakness of the French, the British and the Dutch after the war in Europe, would help to cut off foreign aid supply to China and enable the creation of a Southern front.


Thursday, October 27, 2016

Type 41 75mm Regimental Gun

The Type 41 75mm mountain gun was accepted in 1908 (the 41st year of Emperor Meji's reign, which gives it its Type 41 name), originally a license-build copy of the German Krupp M.08 mountain gun. From 1934, when the new Type 94 75mm mountain gun was accepted, the Type 41 gun become an infantry regimental gun (Rentai Ho). Every infantry regiment was equipped with four Type 41 75mm guns, hence a triangular division as the IJA 23th Infantry Division had twelve guns.

Type 41 75mm mountain gun (commons.wikimedia.org).

Sunday, October 23, 2016

Hohei Regimental Gun Platoon!

The Hohei Regimental Gun Platoon consists on a command team, an observer team and two Type 41 75 mm gun. Used for infantry support, every regiment was equipped with four Type 41 guns, which adds up to twelve guns per division. Detailed info on how to assemble, paint and base Japanese guns can be found in older posts.


Regimental Gun Platoon Command team. 

Thursday, October 20, 2016

Type 94 37mm Rapid-fire Gun

The Type 94 Rapid fire gun was an anti-tank and infantry support gun designed in 1934 (2594 in the Japanese imperial year, from where it takes its type "94"). It was the main Japanese anti-tank gun until the development of the Type 1 47mm Anti-Tank gun in 1941. However the Type 94 gun remained active in all the fronts through the end of the war, as the new Type 1 could not be produced fast enough.


Japanese Type 94 37mm anti-tank Gun abandoned in Guadalcanal, 1942 (ww2db).

Monday, October 17, 2016

Hohei Type 94 37mm Rapid-fire Gun Platoon!

The Hohei Rapid-fire Gun Platoon is formed by a command team and two Type 94 37mm anti-tank Gun. This is the main anti-tank gun of the Imperial Japanese Army in Rising Sun. Every infantry regiment was equipped with a battery of four Type 94 guns, so a triangular division would field twelve guns. You can find detailed info on how to assemblepaint and base the guns in older posts.

Rapid-fire platoon command team. 

Saturday, October 15, 2016

Type 92 70mm Battalion Gun

The Type 92 Battalion Gun was a light howitzer introduced in 1932 (2592 in the Japanese imperial year, from where it takes its type "92"). Since every infantry battalion was equipped with two Type 92 guns, it was named Battalion Artillery (Daitaihō), and therefore a triangular division as the IJA 23th Division was equipped with eighteen Type 92 guns.

Type 92 70mm gun (www.historicalfireamrs.info)

Thursday, October 13, 2016

Hohei Type 92 70mm Battalion Gun Platoon!

The Hohei Battalion Gun Platoon consists of a command team, an observer team and two Type 92 70mm Gun. This gun was used as infantry support, as it could be used as a mortar or in direct fire. Every infantry battalion was equipped with two Type 92 guns, so a triangular division would field eighteen guns. You can find detailed info on how to assemble, paint and base the guns in older posts.


Command team.

Monday, October 10, 2016

IJA 7th Infantry Division

Jacob Meckel (Wikipedia)
In 1895, the Japanese government started a reorganization process of the Imperial Japanese Army with the purpose of modernizing it. The army was to be modeled after the Prussian army, due to the German victory against the French in the Franco-Prussian War. Prussian Major Jacob Meckel was invited to Japan as military adviser to oversee the rebuilding process.

The first infantry division created following Meckel´s advice was the 7th Infantry Division, nicknamed as Bear Division, formed in Sapporo, Hokkaidō on 12 May 1888. Its original duty was the defence of Hokkaidō, and was garrisoned in Asahikawa.

It was originally a square division, meaning that it was formed by four Infantry Regiments, and with two regiments forming a Brigade. It was not yet converted to a triangular division until 1942. At the beginning of the 20th century, the 7th division components were:

Saturday, October 8, 2016

Japanese Guns: Basing!

After assembling and painting, it´s time to base the guns. The command and observer teams can be based exactly as infantry teams. The gun bases, however, require a little extra work. Due to the lack of holes for the men, if you glue the guns and the crew directly to the base, the own man's base will be visible. So we will need to add some plaster filler before gluing the guns.

First step is to place the guns and crew on the bases, in a position that looks cool and realistic. I tried to place the men in different positions for each base, and also switched a couple of men between types of gun. Remembering the setup, glue the crew to the base, leaving place for the gun (but don't glue the gun yet!).

Place the gun and crew in a nice position before gluing the crew to the base.

Wednesday, October 5, 2016

Japanese Guns: Painting!

As the assembly post, this one will describe how to paint the Type 41 75mm Regimental Gun, but the same instructions can be followed to paint the Type 92 70mm Battalion Gun and the Type 94 37mm Rapid-fire Gun. The exact color palette can be found here.

First step is to prime the gun in Black.

Gun primed with black spry. 

Sunday, October 2, 2016

Japanese Guns: Assembly!

This post will describe how to assemble the Type 41 75mm Regimental Gun. The same instructions can be followed to assemble the Type 92 70mm Battalion Gun and the Type 94 37mm Rapid-fire Gun, as they all consist on the same parts.

Each gun blister contains parts to build two guns, gun crew, command team, observer team (except the Type 94) and the needed bases. The guns are divided in five parts: the main body, the cannon, the shield and two wheels.

Different parts of the Type 41 gun.

Saturday, October 1, 2016

Type 3 Heavy Machine Gun

The Type 3 Heavy Machine Gun (also known as the Taishō 14 Machine Gun) was the first Japanese machine gun to be domestically designed. It appeared in 1914, designed by General Kijiro Nambu, and was based on the french Hotchkiss M1914.


Type 3 Heavy Machine Gun (worldofweapons.blogspot.com).

Some differences with the Hotchkiss model were the feed, the fire controls and the locking system. It also modified the caliber, as the French one used 8mm cartridges and the Japanese used their then standard 6.5x50mm Arisaka ammunition.

Thursday, September 29, 2016

Machine Gun Platoon!

The Japanese Machine Gun platoon is made up of a command team and two or four machine gun squads. Each squad is formed by a heavy machine gun (HMG), a gunner, an ammo carrier and a rifle man. In Rising Sun, the modeled machine gun is a Type 3 HMG. For tips on painting and basing the machine gun platoon, check this older post.

Flames of war japanese machine gun platoon
Machine Gun Platoon.

Tuesday, September 27, 2016

General Kenkichi Ueda

Kenkichi Ueda (ww2db.com).
Kenkichi Ueda (植田 謙吉 in Japanese) was born on March 8th 1875 in the Osaka prefecture. In 1989 he graduated from the Imperial Japanese Army Academy (10th class) and in 1908 from the Army Staff College (21st class), serving in the cavalry in between. After graduating he was attached to the cavalry staff. In 1918 he was assigned to the Siberian Expeditionary Army which was part of the allied powers fighting against Bolshevik Red Army in the Russian Civil War. In July 1919 he was promoted to colonel.

Ueda was again promoted to major general in August 1923 and appointed commanding officer of the 3rd Cavalry Brigade. In March 1929 he became commander in chief of the Japanese China Garrison Army based in Tianjin, after having been promoted to lieutenant general in August 1928.  

Sunday, September 25, 2016

Machine Gun platoon: painting and basing!

The Japanese Machine Gun platoon is by far my favorite infantry/gun Japanese platoon. It is made of a small base command team and four medium bases with a heavy machine gun (HMG), a machine gunner, an ammo guy and a rifle man each. 

For the painting, I followed my standard described in an older post. I used some new colors: for the machine gun, a base coat of Dark Gunmetal highlighted with Oily Steel; base coat of Hammered Copper highlighted with Copper for the bullets. 

It is a shame that all the Gunners and ammo carriers have the same pose, but then I tried to base them in different positions. Since the HMG's are more stationary units than the regular infantry, I decided to add to the bases some sandbags. I followed the example on how to make sandbags in this Rust and the City post. Three rows of bags is enough to give a realistic look.

Green stuff sandbags added to the base.

Friday, September 23, 2016

Lieutenant General Michitarō Komatsubara

Imperial Japanese Army Academy, Tokyo 1907
(wikipedia).
Michitarō Komatsubara (小松原 道太郎 in Japanese) was born on 20 July 1885 in Yokohama, Kanagawa Prefecture in Japan. He was the eldest son of naval engineer Goryo Komatusbara, and brother of Sakanoboro Komatsubara, who would become an Army Colonel.

In 1905 at age 20, Michitarō graduated at the Imperial Japanese Army Academy as member of its 18th class. In 1909-1910 he was assigned to Moscow as military attaché to Russia. There he gained knowledge and understanding of Russian culture and society as well as became fluent in Russian language.

Wednesday, September 21, 2016

Hohei Chutai Company Headquarters!

The Hohei Chutai company HQ is made of a Tai-I (captain) company commander and a 2iC (second in command) carrying the regimental banner.

Tai-I company commander.

2iC with Rising Sun banner.

Tuesday, September 20, 2016

IJA 23rd Infantry Division

Liutenant General Komatsubara.
After the start of the Second Sino-Japanese war in 1937, the Imperial Japanese Army (IJA) underwent an expansion process that included the formation of new infantry divisions 15th, 17th 21st, 22nd and 23rd on 4 April 1938 in Kumamoto, on the island of Kyushu.

23rd division, nicknamed as "Sunrise Division" and commanded by Lieutenant General Michitarō Komatsubara, was assigned to Kwantung Army and based in Hailar, Manchukuo, with the duty of controlling the border between Manchukuo and the Mongolian People´s Republic. 

It was a triangular division, meaning that its infantry was grouped in three regiments. At the time of its creation, it consisted on:

Sunday, September 18, 2016

Hohei (infantry) platoon!

The Hohei platoons are the core of the Hohei Chutai (Infantry company). Every infantry platoon is formed by a platoon commander and two or three rifle squads, and each squad is made of three rifle teams and a light mortar team.

1st Hohei platoon.

2nd Hohei Platoon.

Friday, September 16, 2016

Kwantung Army

Map of the area in 1921 (Wikipedia).
After the Russo-Japanese war, in 1905, Japan replaced Russia as holder of the Kwantung Leased Territory. One year later, the Kwantung Garrison was created to defend the leased territory, and was renamed to Kwantung Army in 1919, when it had a total strength of 10.000 men.

Kwantung Army was an army group of the Imperial Japanese Army (IJA), and despite being under command of the Imperial General Headquarters, its officers were known for their insubordinate attitude referred as Gekokujō: "overthrowing or surpassing one's superior" or "rule from below".

Wednesday, September 14, 2016

How to base infantry units step by step!

First step is to glue the painted soldiers to the bases with Super Glue. Some miniatures require some trimming at the bottom of their bases to make it stand better. Try to arrange the miniatures so as every base looks unique.

Miniatures glued to the base.

After gluing them, an optional step is to fill the empty space between the soldier bases and the base holes with plaster filler. Then it is better to paint the filler in any brown color. You can skip this and fill these holes with sand instead.

Materials used for the basing.

Sunday, September 11, 2016

Nomonhan Incident (May - September 1939)

Manchuria Map, 1939
Japan occupied Manchuria in 1931 and established the puppet state of Manchukuo. To the west, Manchukuo's border was the Mongolian People's Republic, the only communist state in the world at that time other than the Soviet Union and a Soviet allied.

In 1939, there were disputes about the border line between Mongolia and Manchukuo, with the Japanese claiming the border to be the Khalkhyn river (Khalkhyn Gol) and the Soviets arguing it to be 16 km east of the river, by the town of Nomonhan. These disputes rapidly escalated to what came to be known as the Nomonhan Incident in Japan and the Battle of Khalkhyn Gol in Soviet Russia.

Japanese Forces at Nomonhan (Pinterest)
On May 11th 1939, about 70-80 Mongolian cavalry men entered the disputed area to feed their horses. Manchuoko´s cavalry attacked and expelled the Mongolians back to their land, but Mongolians counterattacked on May 13th with greater numbers and the Manchuoko's men were forced to retreat. The Japanese deployed the 23th Division led by Lieutenant General Michitarō Komatsubara (under command of the Kwantung Army) and drove the Mongolians out. On May 28th, Mongolian and Soviet forces returned to the disputed area and defeated the reconnaissance regiment of the 23th division, causing the first major defeat for the Japanese.

Friday, September 9, 2016

How to paint Japanese Infantry step by step!

I used the following scheme to paint all the infantry, gun and artillery men for my Japanese army, with small variations for each kind of unit. It is inspired on the Flames of War painting guide but with several differences.

My painting method consists on painting batches of 10-15 miniatures, applying the same color to all of them before moving to the next step. I reckon this method is good in painting speed and reduces wasting paint. I also paint the miniatures before gluing them to their bases so it is easier to get everywhere with the brush. The detailed coloring can be found in the previous post.

First step is to prime the miniatures with the black spray primer.

1 - Black prime coat.


Wednesday, September 7, 2016

Color range for my Japanese army!

In this post, I will go through the color palette I am using to paint my army. I realize that some colors would be not 100% historically accurate, but I weight more the final look of the miniatures than the historical accuracy, and also try to keep the painting economical by using the same color on several elements.
  • Color range:
    • Battlefront Quartermasters Paint set:
      •  Army Green
      • Battlefield Brown
      • Black
      • Dark Gunmetal
      • Dry Dust
      • European Skin
      • Military Khaki
      • Skin Shade
      • Wool Brown
      • Worn Canvas

        Quartermaster set

Monday, September 5, 2016

Rising Sun!

The first Flames of War book featuring the Japanese army was Rising Sun. The book belongs to the early war period (1939-1941), together with Blitzkrieg, Hellfire and Back, Burning Empires and Barbarossa.

Rising Sun cover page.

Rising Sun includes Japanese, Finnish and Soviet lists and focuses on the following battles:
  • Nomonhan incident (May - September 1939), a succession of battles between Japanese and Soviet troops at the border between Mongolia and Manchuria.

Sunday, September 4, 2016

The beginning of the journey!

About a year ago, I decided to start a Flames of War army. After doing a little bit of research about the different countries and periods available, I was quickly drawn to the Japanese. Having enjoyed films such as Letters from Iwo Jima, shows as The Pacific and games as Medal of Honor Pacific Assault, the Japanese had always roused my interest.

Hohei Chutai (infantry company) with banner, HMG and Type 41 regimental gun.