In this post I will explain step by step how I painted the
Type 95 Ha-Go Japanese light tanks that form the
Light Sensha Platoon. They were my first tanks ever painted but the result was quite a success for me. The exact colors can be found
here. I freely followed the
painting guide found in
Rising Sun but with my available colors. First step is to prime the tanks with the
Black spray primer.
 |
| Tank primed in black. |
After the black primer, paint the tank with the Flames of War
German Armor spray. This will be the base color of the tank. Apply carefully two or three thin layers so the details do not get covered.
 |
| Tank in its base color. |
The camouflage pattern that I wanted to get was around one third of the tank in its base color, another third in brown and the remaining third in dark green (a little bit different of the real 50%-25%-25% pattern). So the third step was to paint around one third of the tank using Vallejo Flat Brown, painting stripes on the hull with their origin at the turret. Apply two or three coats of brown to get a nice flat color.
 |
| Tank with flat brown stripes. |
Then paint the brown stripes also in the turret, making sure that the stripes in the turret and in the hull are coincident. The easiest way is to put the unpainted turret on the hull and mark the edges of the stripes in the turret.
 |
| Hull and turret with matching brown stripes. |
For the green part of the pattern, I used Citadel Waagh! Flesh which looks like Soviet dark green. Paint another one third of the tank with dark green, again making stripes originating from the turret. This color was a bit more transparent than the brown, so I applied three to four layers.
 |
| Tank with brown and green stripes. |
Repeat the same process on the turret as with the brown color.
 |
| Camouflage pattern for one tank. |
I applied different patterns for every tank but following the one third proportion, to make each tank unique.
 |
| Three tanks with different patterns. |
Next step is to paint the tracks, the machine guns and the exhaust pipe with Dark Gunmetal.
 |
| Metal parts painted. |
Then paint the wheels with Black. This step can be skipped, but it gives the tank a nice touch.
 |
| Thank with black wheels. |
As explained
here, the base color of the sandbags is
Military Khaki.
 |
| Sandbags painted with khaki. |
Then dry brush the exhaust and the exhaust pipe with Hammered Copper and highlight the sandbags with Worn Canvas.
 |
| Rusty exhaust and highlighted sandbags. |
Now it is time to add a few details. Highlight the machine guns and the tracks with Oily Steel, slightly dry brush the exhaust with Copper and dry brush the sandbags and the wheel area with Battlefield Brown.
 |
| Tank after highlights and dry brushes. |
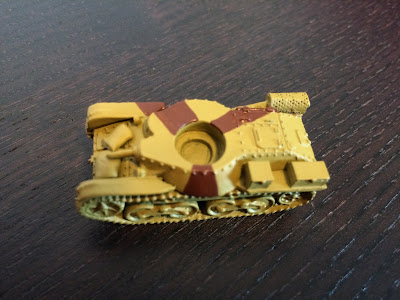
Now it is time to add the characteristic yellow stripe found on the late 1930s Japanese tanks. Starting from the center of the turret, paint a cross with European Skin, first in the turret and then continuing to the hull. Then cover the european skin with Lemon Yellow. By painting the yellow over the flesh color, the final yellow color will be much more intense.
 |
| Yellow cross seen from the top. |
 |
| Yellow cross seen from the side. |
As a final and optional detail, I decided to paint the Japanese Rising Sun Imperial Flag at the back of the tanks using one of the model's detail. First paint the rectangle with Worn Canvas, then highlight it with White and finally try to paint the Rising Sun with Red using a detail brush. The result is not perfect but looks really cool if seen from a distance.
 |
| Cool Rising Sun flags. |
The final step is to apply the Vallejo Umber Wash. I applied a wash over the whole tank (except the sandbags and the officer when present), focusing in the details. This wash really gives the tank a greasy dirty look.
For the tank officers, I made small modifications to the
infantry uniform. For the jacket and pants, I used a base coat of
Japanese Uniform followed by a coat of a equal mix of
Japanese Uniform and
Army Green. The helmet was painted with
Flat Brown highlighted with an equal mix of
Flat Brown and
Battlefield Brown. By doing this, the tank crew uniform looks a bit different than the infantry uniform and the officer has more contrast against the tank colors. The officer is finally highlighted with a dry brush of
Dry Dust.
 |
| First finished Type 95 Ha-Go tank. |
 |
| Second finished tank. Observe the greasy look created with the wash. |
 |
| Third finished tank. |
 |
| Type 95 Ha-Go tank with its commander pointing its sword towards the enemy. |
 |
| Type 95 Ha-Go tank with its officer. |
Banzai!


No comments:
Post a Comment
Note: Only a member of this blog may post a comment.